Installing the ZD&T License Server
The ZD&T License Server is available on the following platforms:
- Azure Cloud
- AWS Cloud
- KVM image for x86 hardware
- OVA file built with VMWare
Note: the License server cannot run on Z hardware, only x86.
System requirements for the License server
Deploying License Server on the Cloud
The ZD&T License server is available as a cloud offering through Microsoft Azure and AWS.
- Login to the Microsoft Azure portal or the AWS Management Console, go to the respective Marketplace and search for PopUp Mainframe License. Click on the appropriate offering, then choose ‘Get it now’ in Azure or ‘Continue to Subscribe’ in AWS.
- Navigate through the wizard to create the VM.
- Once the VM is ready, generate the license following these instructions.
Deploying License Server on KVM (x86 hardware)
1. Download the qcow2 Image
Download the qcow2 image from the link shared with you.
2. Create and Install the VM using KVM
Use the virt-install command to create the VM using the downloaded qcow2 image.
Example Command:
sudo virt-install \
  --name <vm_name> \
  --memory 8192 \
  --vcpus 1 \
  --disk path=<path_to_qcow2_image>,bus=virtio \
  --import \
  --os-variant rhel9.0 \
  --network bridge=br0,model=virtio \
  --graphics vnc,listen=0.0.0.0,port=6901 \
  --serial pty \
  --console pty,target_type=serial \
  --noautoconsole
Modify the settings as per your requirements.
When you run the above command you will be shown the following output:
Starting install...
Creating domain...
Domain creation completed.
3. Connect to the VM
virsh console <vm_name>
Example login:
pm-license-server login: ibmsys1
Password:
4. Start UIM Server
Initially, the port may not be visible.
netstat -ntlp | grep 9451
Restart the UIM server to ensure the port is properly initialized:
/usr/z1090/bin/uimserverstop
Confirm prompts:
Reply with yes
Are you really sure ??? → yes
Clean up existing UIM data and start UIM server:
rm -rf ~/UIMserver
/usr/z1090/bin/uimserverstart
Expected output:
Using port 9451 IPv4
uimserver started successfully
Verify the port stats again:
netstat -ntlp | grep 9451
Port 9451 should now be visible and listening.
5. Generate License
Once the VM is ready, generate the license following these instructions.
Deploying License Server on VirtualBox (OVA file)
1. Download the OVA
Download the OVA from the link shared with you.
2. Import OVA using Virtual Box
You can import the OVA using VirtualBox GUI. However, we suggest using a Command Line Interface (CLI) for the import as this will make process a lot faster than using a GUI.
Open the command prompt, navigate to the OVA download location and run the following command:
vboxmanage import PM_Lic_server.ova
If you want to customize the provisioned VM with command options you can use --dry-run to display all the avalable options:
vboxmanage import PM_Lic_server.ova --dry-run
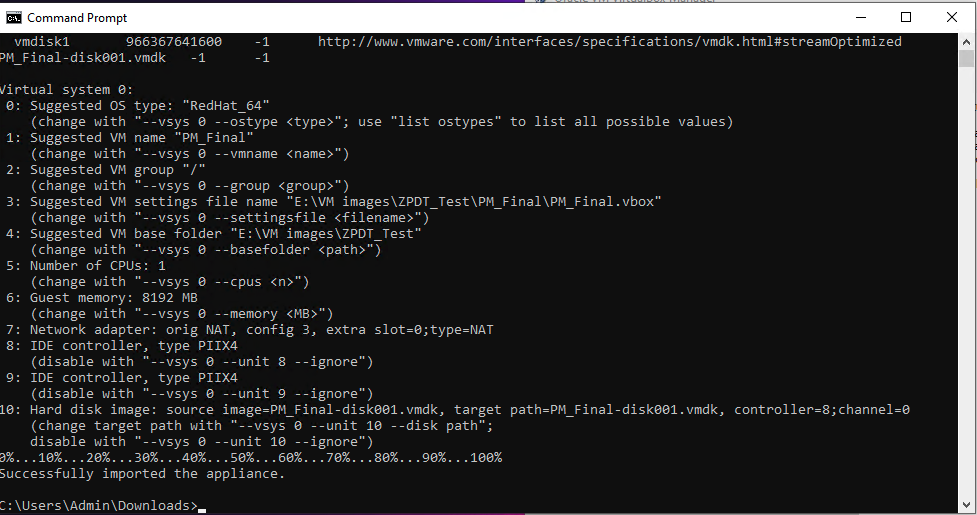
When you run the above command you will be shown the following output. It will not import the VM:
C:\Users\Admin\Downloads>vboxmanage import PM_Lic_server.ova --dry-run
0%...10%...20%...30%...40%...50%...60%...70%...80%...90%...100%
Interpreting C:\Users\Admin\Downloads\PM_Lic_server.ova...
OK.
Disks:
  vmdisk1       966367641600    -1      http://www.vmware.com/interfaces/specifications/vmdk.html#streamOptimized       PM_Lic_server-disk001.vmdk      -1      -1

Virtual system 0:
 0: Suggested OS type: "RedHat_64"
    (change with "--vsys 0 --ostype <type>"; use "list ostypes" to list all possible values)
 1: Suggested VM name "PM_Lic_server"
    (change with "--vsys 0 --vmname <name>")
 2: Suggested VM group "/"
    (change with "--vsys 0 --group <group>")
 3: Suggested VM settings file name "E:\VM images\ZPDT_Test\PM_Lic_server\PM_Lic_server.vbox"
    (change with "--vsys 0 --settingsfile <filename>")
 4: Suggested VM base folder "E:\VM images\ZPDT_Test"
    (change with "--vsys 0 --basefolder <path>")
 5: Number of CPUs: 1
    (change with "--vsys 0 --cpus <n>")
 6: Guest memory: 2048 MB
    (change with "--vsys 0 --memory <MB>")
 7: Network adapter: orig NAT, config 3, extra slot=0;type=NAT
 8: IDE controller, type PIIX4
    (disable with "--vsys 0 --unit 8 --ignore")
 9: IDE controller, type PIIX4
    (disable with "--vsys 0 --unit 9 --ignore")
10: Hard disk image: source image=PM_Lic_server-disk001.vmdk, target path=PM_Lic_server-disk001.vmdk, controller=8;channel=0
    (change target path with "--vsys 0 --unit 10 --disk path";
    disable with "--vsys 0 --unit 10 --ignore")
For the purpose of this article we are only using the --vmname option to change the VM name
vboxmanage import PM_Lic_server.ova --vsys 0 --vmname=pm_lic_server
Once the import is completed you should see a message similar to this:
3. Customize the VM
Open the VirtualBox GUI and go to the newly created VM Settings > Network. The default network option is shown "Nat Adapter" you can change it to whatever fits your needs. Just make sure that this VM will be able to communicate with the other Z&DT PopUp Mainframe VMs.
Once you completed the configuration start the VM; log in, to the license server.
4. Generate License
Once the VM is ready, generate the license following these instructions.
Generate License
Note: Once the updated license file has been applied you cannot change the device for the license server or change the underlying storage as this will invalidate the license. If you need to do this please get in touch with the PopUp Support Team.
Steps to generate license file
1. request_license on the license server
Once logged in to the license server, execute the below command to generate the license request file:
sudo /opt/IBM/LDK/request_license
Example Output:
zPDT/LDK license request started.
fingerprint status 0
The request file created is: ~/zpdt_1604356711.zip

Success
The generated <hostname>_xxxxxx.zip file, located in the root user's home directory, contains the fingerprint information for the license server.
Move the generated file to the ibmsys1 user's home directory and update the ownership using the following commands:
sudo mv /root/<hostname>_xxxxxx.zip /home/ibmsys1/
sudo chown ibmsys1:ibmsys1 /home/ibmsys1/<hostname>_xxxxxx.zip
Copy the generated file to your local machine. This can be done using any file transfer tool such as WinSCP or by using the scp command.
Example scp command:
# Syntax
scp <source_username>@<source_server_ip>:<source_file_path> <local_destination_path>

scp ibmsys1@<license_server_ip>:/home/ibmsys1/<hostname>_xxxxxx.zip .
# This will download it in the current local directory where the command is executed.
Once the file has been copied to your local machine, send it to the PopUp team via email. In return, you will receive an *update.zip file.
2. update_license
Once the update license file is received from the PopUp team, upload it to the license server using any file transfer tool or by using the scp command. Then execute the below command from the directory where the file is located.
sudo /opt/IBM/LDK/update_license <hostname>_xxxxxx_update.zip
The licensing process is now complete.
3. Query the license usage (optional)
Licenses are "floating", which means that the number of PopUp z/OS environments running concurrently must not exceed the number of licenses available. On a PopUp VM, if the z/OS process is stopped, it will not be consuming a license.
To view the status and usage of your PopUp licenses, including how many are currently consumed, you can do one of the following:
- Run this command from the license server
sudo /opt/IBM/LDK/query_license
- View real-time license usage through a web-based dashboard. We can provide you with a pre-built Grafana dashboard for license usage. Alternatively, we can share scripts and help you create one to suit your requirements.
Returning a license
Returning a license is a multi-step process:
- Follow all the steps listed above in 'Generate License' (steps 1 and 2).
- Generate the request file again by running
request_license(repeat step 1). Send the newly generated request file to the PopUp team.
Page last revised on: 2026-06-16