PopUp Configuration
Storage Configuration
DASD volumes are used for storing data and executable programs (including the operating system itself), and for temporary working storage. DASD labels identify DASD volumes and the data sets they contain.
Users may need one or more user volumes to isolate configuration data for some of their products or may need to create additional volumes when the storage is full. For example, you might want a new volume for a particular application or a newer version of an existing product.
SMS Volume Allocation Guidelines
Once the base PopUp Mainframe is provisioned (before the business data is migrated to PopUp Mainframe) we strongly recommend you to utilize create_volumes utility to create additional volumes in the relevant category suitable for your application size as part of a DASD storage management plan.
This utility creates SMS-managed DASD volumes as well as auto-updates the dasd.def file with the volume information, which is included in the devmap file. It can create a maximum of 256 volumes, utilizing appropriate device ID ranges for different volume categories. See here for more details.
Using the create_volumes PopUp utility
Sign in
To create a new DASD volume on your PopUp, follow the below steps.
Sign in to the PopUp using SSH from the command prompt as ibmsys1 user using the login credentials supplied by the PopUp Team:
ssh ibmsys1@<ip address>

Execute the script
On the home directory, type the below and press ENTER:
/usr/local/bin/create_volumes

You will be prompted with the below screen. Select the appropriate option, navigate to OK and press ENTER:

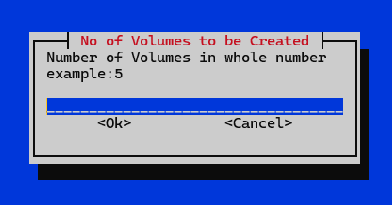
You will now be prompted with the below screen. Provide a numerical value in the field, navigate to OK and press ENTER. Please note that by default, all volumes created are 53 GB each.
Here you can see the Volume creation has started...the progress percentage will increase as the storage is allocated. Wait until this is 100% complete, it will take few minutes.

Upon 100% completion, you will be presented with a brief completion report as shown below. In this case, an 8 GB volume was created with the name "USER05". As part of this process, the devmap file (used for IPL) is also updated with the new DASD volume and device ID details.
The PopUp Mainframe will now shutdown and restart automatically.
Automatic PopUp Mainframe Shutdown
Check for the below message, showing the PopUp shutdown:

Automatic PopUp Mainframe Start
Check for the below message, showing the PopUp startup:

Automatic Mainframe Job submissions
Further jobs for volume initialization and SMS conversion are submitted automatically:

Now the DASD volume is created and is assigned to the appropriate SMS assigned available in the PopUp.
Verification on PopUp
Now logon to PopUp Mainframe. Go to S;SMSG :

You can see all the SMS storage groups listed:

Type ‘L’ against the SGBASE storage group – this has the user volumes in it. Likewise, SGDB2 storage group has the DB2 volumes in it:

You can see the new user volume USER05 is now available for use:

Notes
- Please ensure all users are logged out (not using the PopUp) during the volume creation process.
- PopUp will shutdown and startup during the volume creation process.
- Do not terminate the process in the middle of the execution. This may result in the PopUp not being started.
device-id ranges
The below table shows the list of various volume types and the max number of volumes created by the create_volumes utility. Additional DASD volumes (SMS and NON-SMS types) can be manually created and enabled. For manual process, create a new definition file (similar to dasd.def) and include it in the devmap file, otherwise your new volumes will not be accessible.
| DASD VolumeType | Storage Group | device-id Range usedby create_volumes | Max Volumeshandled by script | Purpose & Recommendation |
|---|---|---|---|---|
| APPL | SGAPPL | APPL01 - 0F APPL10 - 1F,20 | 33 | Utilized to store all test datasets, application files, user files etc. |
| ARCH | SGARCH | ARCH01 - 0F ARCH10 - 15 | 20 | Utilized by Db2 to store DB2 ARCLOG Files |
| CICS | SGCICS | CICS01 - 0F CICS10 - 15 | 20 | CICS System and Application data |
| DB2 | SGDB2 | DB2001 - 00F DB2010 - 01F DB2020 - 02F DB2030 - 038 | 56 | All Db2 data should be stored in these volumes |
| IMS | SGIMS | IMS001 - 00F IMS010 - 015 | 20 | All IMS data should be stored in these volumes |
| MQS | SGMQS | MQS001 - 00F MQS010 - 015 | 20 | All MQ messages/queue managers data should be stored in these volumes. |
| USER / ZDT | SGBASE | USER01 - 0F USER10 - 1F USER20 - 2F USER30 - 38 | 56 | Whenever the storage reaches its full capacity for any of the above volumes, the data overflows into USER/ZDT volumes. Also used for storing log files. |
If you encounter any issues, please contact the PopUp Mainframe Support Team.
Device Configuration (devmap file)
The devmap file is the core configuration file for PopUp, which acts as the backbone and a bridge between the Linux layer and the z/OS layer of the PopUp Mainframe. IPL is heavily dependent on this file, and any changes in the devmap file require a re-IPL of the PopUp before they take effect.
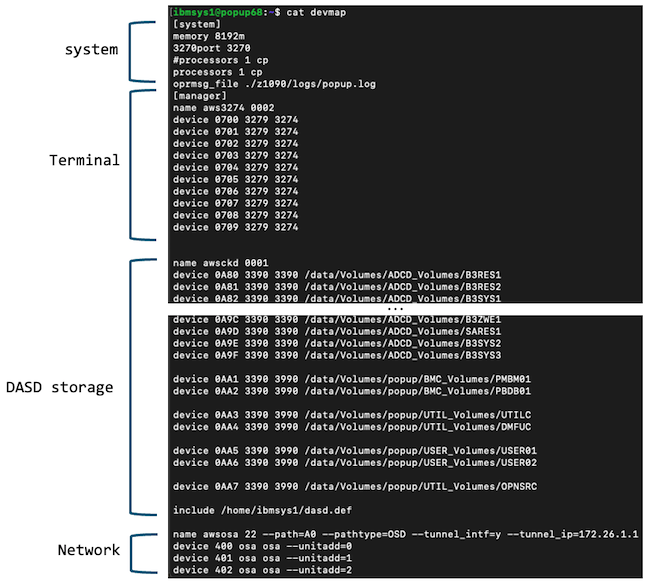
As shown below, devmap files typically contains four stanzas:
System: System-level information, including memory allocation, number of vCPUs, ports, log information etc (which depend on the underlying Linux config). Note: The number of vCPUs (processors 1 cp) defines the number of PopUp licenses consumed. Increasing the processors defined in the devmap will consume more PopUp licenses, and IPL may fail if there are not enough available.
Terminal: The terminal device identity, number of terminals that can be handled, etc.
Storage: z/OS system level and application level I/O device details (DASD storage devices) and path.
Network: Connectivity between the PopUp Mainframe Linux layer and z/OS, and and external systems.
Note: A maximum of 256 devices can be listed in a stanza. Additional devices above the 256 threshold should be placed in a new stanza with a unique hex number.
Find out more
For more information on the devmap file, please refer to the IBM RedBook, chapter 3.
Network Configuration

ZD&T will create a virtual network to communicate between the Base Linux and z/OS. You can read more about this in Redbook IBM RedBook "chapter 7"
In PopUp Mainframe, we have configured the Linux firewall to route all the traffic coming to 192.168.1.100 LAN IP (except for these ports 22, 80, 3270, 9001) to the local virtual interface network IP for z/OS. For z/OS 3.1, this is 172.26.1.2, for z/OS 2.5 and 2.4 this is 10.1.1.2. This routing ensures all the services running in the emulated z/OS can be reached from LAN.
PARMLIB/PROCLIB Cadence
In PopUp Mainframe, overrides are applied in the exact sequence defined in the table below.
For z/OS 3.2
This order reflects the updated cadence introduced for z/OS 3.2
| Order | Library | Notes |
|---|---|---|
| 1 | USER.PARMLIB USER.PROCLIB | You can safely make your own additions or customisations. This will override all the below libraries. |
| 2 | SYSCFG.POPUP.PARMLIB SYSCFG.POPUP.PROCLIB | PopUp customisation exists here. You may also use this library to add any new members. Revisions to current members are not recommended. |
| 3 | VENDOR.PARMLIB VENDOR.PROCLIB | These are meant to hold customised parameters/procedures supplied by vendors for any of their tools. |
| 4 | SYS1.PARMLIB SYS1.PROCLIB | This should NOT be modified. Used for IBM Stock Image upgrades. |
| 5 | SYS1.PARMLIB.INSTALL SYS1.PROCLIB.INSTALL | This should NOT be modified. Primarily used for z/OS SMP/E maintenance. |
For other z/OS versions
For z/OS 2.4, 2.5, and 3.1 versions, the system enforces the traditional override cadence as specified in the table.
| Order | Library | Notes |
|---|---|---|
| 1 | USER.Z*.PARMLIB USER.Z*.PROCLIB | You can safely make your own additions or customisations. This will override all the below libraries |
| 2 | FEU.Z*.PARMLIB FEU.Z*.PROCLIB | PopUp customisation exists here. You may also use this library to add any new members. Revisions to current members are not recommended. |
| 3 | ADCD.Z*.PARMLIB ADCD.Z*.PROCLIB | This should NOT be modified. Used for IBM ADCD upgrades |
| 4 | SYS1.PARMLIB SYS1.PROCLIB | This should NOT be modified. Primarily used for z/OS SMP/E maintenance |
Page last revised on: 2026-07-02